Old The Game - Dev Log

Making Subtitles 17/03/2021

The beginning process for making subtitles is to make an excel sheet. My first attempt at importing one failed due to me making the sheet incorrectly.

I then watched a tutorial for help and I saw my problem. The left side should be (Top left) Empty (under top left) a column of numbers going down. Then the top middle, which for me was for Text. I named it Text meaning its going to be the name of that column, next to it I put room and added a series of number underneath so I can go back to them later to be more specific but in this scenario I didn't end up using the room column.

I then later updated the words to be lyrics to one of my songs just to test how it works. In UE4 I started editing the text on the actual data table rather than going into the spreadsheet file and updating it there and then reimporting.
I then made a widget blueprint for the subtitles to appear on and then I made a subtitle Manager (actor) so I could choose which command gets sent to play which subtitles at certain moments.


I then connected the text in the widget to a new variable I made in the widget called “Subtitle” which I used as a universal variable that can be edited by almost any blueprint so that when the manager is updating everything it can access the Subtitle variable and change it to the necessary words.
I made 2 custom events which I can use for automation. The first one which is the most simple is just “Clear Subtitles” which all I had to do was get the Subtitles Widget and make it a variable and attach that to a display line target, and then on the event begin play I make it create the subtitle widget and then connect to the “Set Subtitle Variable” of which I connected that to add to viewport and then clear subtitles. This allows me to (when needed) clear the subtitles to the beginning whenever starting the game. The next piece was the “Show next line” which is also a custom event which i added 2 outputs to, a First line output and a “List Sub” which is the name of the list of text I have. I then connected the “List Sub” and the exec to a “set List Sub” and connected that and the First line output to a branch meaning if its true or false the branch will update the list to either the first piece of text if true and if false will go up the text by 1. Therefor if I have ten lines of text and I run the true and then false condition and then pause only 2 lines would have been used.


I then packaged it into the manager so it was a single function to show the next line, so I can use a level sequence to quickly find this.
So here I got a level sequencer and I imported some audio as a wav and then imported it into the Level Sequencer. Once I had done this I made keys at the beginning of every sentence which I could use as locations for when certain lines of code will run. The first key I right clicked and chose to equip a function to that key and then I chose “show line” and then for the keys that come after I do the same thing but I choose the “Next Line” function instead of the “show line” function.
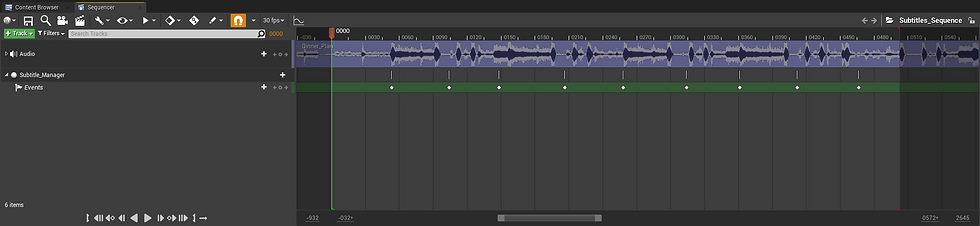

A issue I ran into whilst doing this was that the lines would be connected for some reason. Therefor meaning every time the code would run it would be stuck on whatever line it started on, unless I already broke the lines. So rather than having it be easier and faster I have to go into the code every time hold “alt” and click on the “first line” and “list sub” lines to break them as they will break the code.
I had finished the level sequence but unfortunatley the video has been lost to time
Targets 17/03/2021
What do I aim to get done? I aim to get a game out and working, nothing large but I game where you can experience a short story with voice acting and nice graphics.
What do I need to learn? I need to learn how to make 3D modeled characters emote so a still image of the character can still have emotion and I also need to learn to UV texture better for the graphics of my game.

Artwork/Dev: My artwork will look relatively similar to “That Dragon, Cancer” but I want to give it an original look. I'm not going to design anything in a realistic way but I more stylized fictional way. The code I have almost finished with research, the only issue I haven't explored yet is level streaming. With my rooms I will also make it very dark around the main area so that player don't explore elsewhere and so they can feel like they’re trapped into thinking about/like this. I will try work on some rooms for now.
White Boxed Level Map 17/03/2021
This is a general idea for the beginning level.


Thirty Flights Of Loving - What I Can Take From It 18/03/2021
Thirty Flights Of Loving was an interesting story game with a very cool linear story and art style, the game makes the player jump around in time and allows the player to slowly understand what's going on. In my game I will definitely be moving through time but not in a fast cut fashion, for my game ill be using doorways or lighting to send the player into the next scene. So by walking through a door or by standing somewhere for long enough making the lights turn off and turn on again in a brand new surrounding. I also like the art style and how simple yet complex it looked. It set up a good surrounding and I think ill definitely take inspiration from it.
Art Style - Inspiration 18/03/2021

Thirty Flights Of Loving - The art style for this game was simple but very real and cartoony at the same time, It set up a good surrounding and I think ill definitely take inspiration from it. I like the look of the characters and weaponry in this image and the whiteboard which does not look like it fully belongs in this world. I will definitely take certain aspects of this game into my game but most likely not the square heads.

Into The Spider verse - The art style in this movie was phenomenal but I wont be drawing my inspiration from majority of the movie but Spider-Gwen's Universe. I love the color palate and the paint affect on it. Im not fully sure how I could integrate this style into my game, I may use some Photoshop filters to assist me in this endeavor but I shall see.

That Dragon, Cancer - This game is beautiful and this is where I was planning on take most of my inspiration from, with the simplistic polygon surroundings with realistic lighting is so beautiful. I do not want to steal the art style as it is so I will be adopting these other games styles into my own to create my own personal style.
Personal Style - With this I am planning on using the simplistic, box look of the furniture from “Thirty Flights Of Loving” and then trying to use the art style from “Into The Spider Verse” on some furniture but not keeping the same bright palate and using “That Dragon, Cancer” as an idea for designing the characters.
Mirrors 19/03/2021
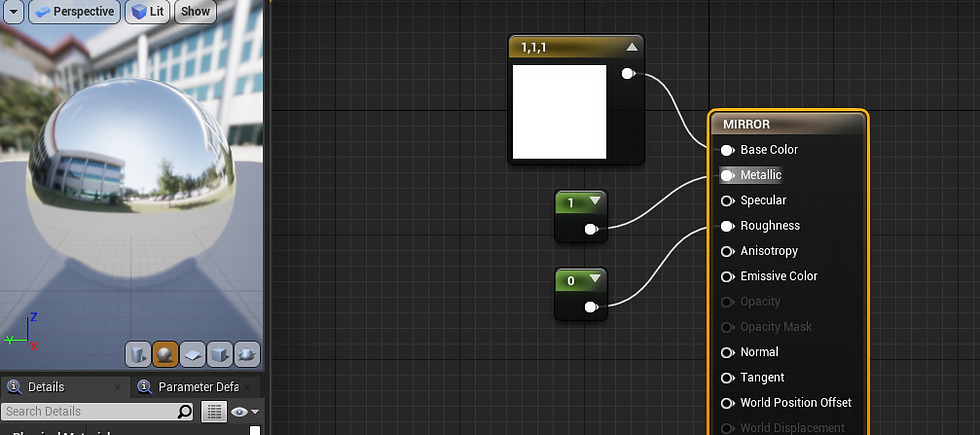
I made a mirror in my game so I could have the player look at it and see themselves get teleported elsewhere. When I did this I originally made a material which 0 roughness and 1 metallic. Which would’ve worked perfectly but my room was too dark so light was not reflecting the way I wanted it to.

So then I made a new mirror by using a “canvas render target” and a material which then all I had to do was add a “Scenecapture2D” which showed off wherever I wanted the camera to show, so I put it directly in front of what would be the mirror and it works perfectly.
Static 19/03/2021

In the Media source all I had to do was make a video folder in the content file in UE4 and then select it in Media Source. I then added a media player and selected that media source and selected “play on open and Loop”. When I made the media player it gave me a media texture. I made a material and dragged in the media texture and connected it to base color. After this all I had to do was make a plane and add the material to it. and it now plays the static
Targets For Today 19/03/2021
By lunch ill finish grey boxing and at the end of the day I should finish writing a script and interpreting it into the data table.
For the next 4 days I’ll try get actual voice acting in the game which I can match up with the data table and have each dialogue be used in specific rooms.
Script Idea 19/03/2021
Room 1 - Heartbeat monitor beeping Hey mom, sorry for being so late today, I brought some cards though! some static noise
Room 2 - Heartbeat monitor long beep” Hey mom, sorry for bei- .... mom..... some static noise*
Room 3 - “static and bottles clinking” Another..... more static noise
Room 4 - Laughing and static I loved those nights.... She was always so happy.
Room 5 - Shouting and ticking -MOM Where were you? -YOU “its not even that
late!” -MOM Your eyes are diluted, are you high! -YOU“Just fuck off!” - I’m sorry mom.... more static noise
Corridor - Static grows louder and every memory noise happens at once.
Room 6 - You walk through and there is now no noise other than the heartbeat monitor. Mom at the end of the long corridor whilst you stand there. *The static noise jumps in very loudly drowning everything out. Whilst you walk further the static closes in on you. -MOM “Come to me or face it, face your pain.” You either walk towards the mom shrouded in red or the scarier mom that has fire and static around her. If you go towards the static mother you get a final memory of you and your mom playing some board games in the hospital and her laughing. YOU- “At least she was happy......”
Gantt Chart 19/03/2021
I'm planning on fully getting my code done and getting the script finalized and fully written. I also need to model the characters and objects and UV them. This is all shown above in the Gantt Chart. The tools I will use and have been using is “Maya” for my modeling and UV texturing, I will use photoshop to design the UVs. I am using Unreal Engine 4 to work on my game and I will drop everything I’ve worked on into ue4. For the voice acting I will be using people on my discord to get actors and they will be using whatever software or hardware they have available.

Making 3D Models 25/03/2021

When I began making this, I used models from make human and tried to use a "separate" mode so it would lower the amount of polys and make it 60% less polys but it looked too weird. So instead I made my own out of spheres and cylinders which I then used "separate" on and then I used the line select tool and selected some lines and held control and then clicked delete so I deleted my own polys. I then duplicated this and made it thinner to make the female character.
Animating A Character 25/03/2021
I made a blend space and a 3D model I made and then added the animations I got from Mixamo in and connected the Idle anim to the bottom middle and then I added Walking Anim to the center.


I made an animation blueprint which was an animinstance which was connected to the skeleton for the character. I opened the Event Graph and dragged off of "Try Get Pawn Owner" I attached it to "Get Velocity" and then to a "VectorLength" - I made a variable called speed which was a float which I then dragged out a set speed. In the Event Blueprint Update Animation I dragged off it and attached it to a "Is Valid" and then connected it to the set, I then went in the AnimGraph, and connected the Blend space to the output pose and then connected the "Get Speed" Variable to the X axis on the blend space.
Modelling In Maya 15/04/2021
To begin the process of making my model I first looked on google for some characters to get inspiration and to use in Maya to build my characters around them.


Once I had this down I placed a square and started extruding it into ways to make the sqaure into the shape of the body. Once I had this down I started selecting vertexs and moving the vertexes in each view and moving them to make the shape more exact. I then shift rightclicked when having object mode selected and selected “Inster Edge Loop” and used the new vertexes to add more detail to create a bend in the legs and the neck, ankle and other places. This was very painful for me to do after awhile as I was working on this for awhile until I accidently clicked something, Im not fully sure what but it made all of the vertexs and edges tangle and merge into certain areas in the crotch region. After awhile of research and trial and error I found a fix which looking back at it is very simple but I was trying too hard to bridge the gap rather than delete the new vertexes that were causing the issue. I finally did it and then started working on the head. I was super tired and I tried to work on it and I got a general thing going but I still need to work on it.


Weekly Evaluation 16/04/2021
What Went Well - I did good job with modeling, i modeled some characters which I am not fully sure if, id use or not.
What could’ve gone better - I need to get better at making heads and finishing some code for my game
What to do next week - I will model some heads and finish some code for my game
Modelling In Maya 2 21/04/2021
I started modeling a new character as I thought my last character had not turned out how I wanted. I used a reference image to build off to get a general body and face to start with. My character looks a tad more buff than the reference image but I think it does the job well as a low poly character. I will make another one soon but as a girl, I’ll use the same reference image but make it look more feminine and once I get a body sorted ill get hair made to make the genders more direct.


I never stopped using one block, I used one cube for this entire model, just kept extruding and deleting or creating lines to add or delete faces to build off of.
Animation in UE4 21/04/2021

I got my model and then I put him into mixamo and got a skeleton created. I first downloaded the character on his own so I could have a single skeleton and mesh. I then chose an idle, walking and running animation as a basis for my animation blueprint.

I then made a blendspace and put the idle on the bottom speed, walking in the middle speed and running on the top speed, I then saved and left. I made an animation blueprint and put that blendspace in and then made a speed variable which was a float and then connected it to the bottom blend space cord.

I then used an “event blueprint update animation” and connected a “try get pawn owner” into a “isvalid” meaning if the pawn owner is valid then we can do whatever with it, in my scenario the is valid is connected to setting the speed with the speed being set by the “get velocity” which is then changed into a float from the “Vector Length”
Level Streaming 22/04/2021


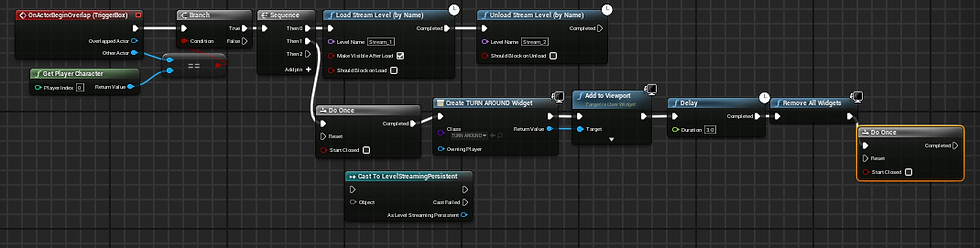
Level streaming seems way easier than it was presented. I used it now to make the world behind the player disappear and be replaced with something else. So first I went to Window and Levels - Which then brought this menu up, I created two more levels and named them “Stream_1″ and “Stream_2″ and they were kept under Persistent Level which is the level which never changes, that always stays in the world which I hadn't known prior so I made the mistake of trying to unload the Persistent level which made nothing happen at all, I then had to copy and paste everything from Persistent level into “Stream_2″ and then delete them from persistent level. Stream 1 is the new room, so I just selected “Stream_1″ and built a new room and then I placed a Box trigger and opened the level blueprint. I then did an “ActorOverlapBoxTrigger” and connected it to a Branch, which then had its condition attached to an “==“ and connected that to “get player character” This means if the other actor is the player then it would count as true. I connected the true part to a sequence and then connected the “then 0″ to “Load Stream Level (by name)” named it as “Stream 1″ and then I connected it to “unload stream level (by name)” and made that one “Stream_2″ and then ticked the “Make Visible After Load” so it can be seen once loaded. This makes the new room load in and the older rooms get unloaded.
Level Streaming 22/04/2021
I created a “Turn Around” widget which will show up on the players screen once they have overlapped the hitbox which spawns the second level in the level stream and tells the player to turn around to see the second room and then have them make their own decision on which person to choose.

This is what it looks like, I also animated it to jump up at the camera and back so it looks more urgent. I also chose this font because of into the spider verse as in that movie when the Green Goblin was about to attack Miles behind him was a big “LOOK OUT!” Which I think looks cool stylistically and just works well to show urgency.


Interacting With A Chair 22/04/2021

I made a Chairand placed it in the world with a large collision capsule, I made the capsule overlap so that the player will never see or feel the capsule but will still be sending code. I made a image with the letter E on it with the text “Press E To Interact” to tell the player that they can and how to interact with the chair. I added some code to the “E” button and made it so it will show the player when its been clicked by turning darker. I got 2 linear colour variables one being the normal colour of the button and the other being a darker tone of the original. I connect the pressed button to a Return node which connected to the true part of a branch with a boolean connect of another custom variable which says if the button E has been pressed. Same with the Normal colour but i connect that ones return node to false on the branch. these are both connected to “Get colour and opacity 0″ which is there as I binded the “Get colour and opacity″ setting to a function to allow code to run through it so it can change.

With this code it was quite complicated to do as many bugs kept appearing. The first code i made was the “Enable Use Of Interact Key” Code, this code had “Event Begin Play” connected to “enable Input” and the player controller of that was connected to “get player controller” this allowed the players controls to update this code. Now there is the “Press E To Interact” code, this code starts with “InputAction Interact” (which means when the binded Key to that action is interacted with code attached to this will run, this is then connected to a boolean with a tick which is then connected to a delay that lasts 2 seconds which is then connected to another “set is pressed” boolean which has their target connected to the return value from “Create Interact widget”, the set is pressed connects to remove from parent which plugs into “gate” enter. Now onto the “checks if close” Code, we start will “On component begin overlap” connecting to “do once” and having the “do once” and the other actor on “On component begin overlap” object which connects to the “Add or remove prompt” group of code which plugs into “create interact widget” adds to viewports and has the target plug into return value, the add to viewport code plugs into the Gate in the open section. and still on the “Check if close” code we connect the “On Component End Overlap” to sequence and connect sequence 1 to the “Do once” connect to the Overlap one and then 1 to “cast to first person character” with the object connecting to other actor, we branch off from the “cast to first person character” and connect it to “remove from parent” which plugs into close on the gate and their target plugs into the “create interact widget” from earlier.

End Scene - Maya 23/04/2021

I began modeling my end scene for Maya but getting an image of a hospital room and attaching it to a plain, which I then extruded special details to make it seem realistic. I then got a high resolution floor to match a hospital and then I got a high resolution bed, chair, female and male character to put in.

This is supposed to symbolize his final memory and how he will get through the pain (being the red) and enter the light where he is with his deceased mother having a last happy memory which then fades to black. The rigging for the characters were easy as all I did was use mixamo to create the rig and then I had to make the models pose by hand, by making places in their rig bend and be positioned so that their posture looks real and proper and to make sure I had no clipping but as soon as I made a

timeline it resets everything so now they're just floating and t-posing.
I will work on this another time to fix and finish it. I also got to record inside Arnold viewer so I can get the video I need, but I have a tutorial to watch before I can make it happen.
Game Cover Art 24/04/2021

I made this in photo shop. I also extended the bottom and top as it was too wide and too short so instead I cut a portion of the walls and copied them up and smudged the lines to make it look like it matches. I also used a font from Dafont.
END SCENE MAYA -PART 2 29/04/2021
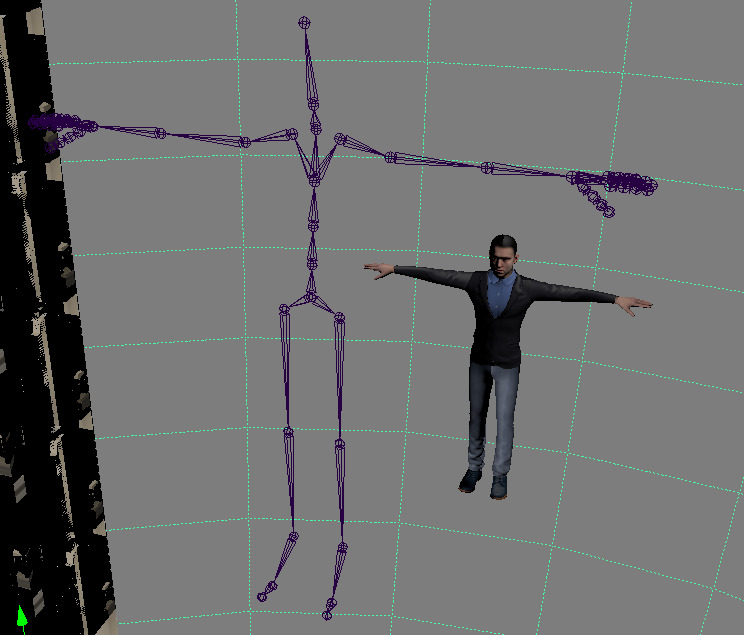
I tried to fix the characters but their models have lost their textures so I have had to delete the models and reimport them into Maya to be used but when I did this at first it randomly deleted an entire row of walls, so I had to figure out a different way of doing it. I opened a second Maya application and opened the model in there from which I just copy and pasted it into the project and it worked fine from there. One thing I learnt here is also how to scale meshes with skeletons without running into this issue.
What I have to do so I dont run into this issues is select the skeleton only and scale it from there as the mesh sticks to the skeleton so it also gets scaled but to the same amount without any breaking.
Error In Animation 29/04/2021
I finally rigged the character and got their positions set up, but when I open the animation workspace and use the timeline it makes them go back to t-posing state. Meaning I would have to restart the whole rigging position process but I found a way to fix this by deleting type by history and then using the animation workspace and that worked.
Animating in Maya 30/04/2021

Finally having the other steps finished I then go to create, cameras and the camera. Put the camera in the position you want to.
I got my animation finished now I open Render settings and name my file, change the image format to PNG and make Frame/Animation ext be “name_#.ext to make the files more separate. I then made sure it started on frame 1 and ended on frame 500 - being the last frame. I chose Camera 1 on the Renderable camera option and made the quality HD_1080.

Sampling has Anti-Aliasing which lowers distortion and if I set it to 8 it will take longer but lower distortion by a lot. The others work with smoke or cracking, like dots that appear that aren't supposed to be there. Once I finished this I opened the rendering work space and went to the top top called render and clicked on

rendering sequence and allow it to render the images. I then use Check to make an animation from my images and then I import it into Adobe Premiere and import media, click on the first image of the sequence and select image sequence
Cinematic Scene 30/04/2021
I made an end scene for the game and for the trailer I am planning on making. This was all done in Adobe Premiere after I exported the render from Maya and FCheck. I used a font from dafont and I used effects from Premiere pro to make it look glitchy but it didn't do exactly what I wanted so I cut some parts to add some dark bits and I made the glitchy parts short and made some of them have a different glitch pattern. I then exported it as H.264. I got the audio from YouTube studio’s audio library so I wouldn't have to worry about copyright and I edited some of them in Adobe Audition to add extra effects.
Level Sequence 06/05/2021
When I originally started this I used a normal camera which caused me a lot of issues, it wouldn’t connect to other players, I couldn't export the video and I had to use the Level Blueprint to make it work which caused me to delete a lot of work and add it to other places but differently. Unfortunately I lost my save so all the work I ended up doing was for nothing but I learnt a bit from it and one thing I learnt was to use a cinematic camera instead because its easier. I dragged a cinematic camera in the game and put it in the start position I wanted.

I then made a new Level Sequence named it what I wanted (being CameraMove) and then I selected the camera, clicked track and chose to track the CineCameraActor1.
I then marked its first position (being the starter one) by clicking this plus with a circle around it next to the “Transform” area and moved the camera to different areas of where I wanted to and kept clicking that as I know that UE4 will just have the camera move to the frame and not have me have to animate it manually.

I then exported it by selecting the frames and then clicking the movie Clapperboard and which it would export into a location in either my Hard drive or inside the UE4 files.
Questionnaire 06/05/2021
I made open questions and 5 closed questions. I will be posting this on reddit and send to some friends so I can get some responses so I can improve my game
The open questions are:
What is your understanding of the story?
What do you like about the art style?
What can be improved with the art style?
Did you get stuck somewhere?
If so where? How did the game you feel?
The closed Questions are:
Is the dialogue clear and understandable?
Did it run well? (FPS)
Would you recommend it to others?
How long did the game take you?
What was your favorite room?
I then ended it with “Any Other Comments?” Incase people had any issues I did not address
Removing Crosshair 07/05/2021

I opened “FirstPersonHud” and deleted the code inside it as all of it is useless to my game. I am thankful to the questionnaire for reminding me about the crosshair.
Evaluation 14/05/2021
On this project I’ve learnt a lot and I’ve had to change a lot. I’ve started working on a new project and I’ve been adding new ways to plan my project. I’ve started using Trello to start getting the whole project planned first and then I gather each part I need to do and categorise them into which I need to work on now, to be worked on, finished, needs testing and possible update. I used different game dev youtubers to get some of this info, such as a youtuber called Randy which helped me understand a lot about solo game making. This technique was learnt after the proposal but I think it would definitely allow me to create a more clear and concise plan with my proposal which would allow me to make more definite plans.
For my project I had to scrap using voice acting as I could not get access to any studios in school in the time span I needed, so instead I stuck to using just dialogue text alone. I’ve also had to scrap 2 separate models which was painful as those models took days to make due to bugs that would happen or me trying to make them perfect and then realising it's better to scrap them and restart rather than have a character that does not match the aesthetic. I also grey boxed the map but after a while I decided that the grey boxed map matched the theme I was going for so I kept the grey boxed map and tweaked little parts to make it still have a less in progress feel to it.
My expectations were quite high for this game and I must say I am not disappointed, I wanted to have voice acting in it but of course I had to delete it but I have also added a lot more than originally planned. I added small things like a mirror to help push and give the story extra meaning with the static and tv playing static which I think definitely gave my game extra flavour. One of my favourite things in my game that wasn’t planned is definitely the end scene with the cute scene I animated in Maya and Unreal Engine. I think they turned out well and gives the player a nice visual to see as the game comes to an end.
I think my project definitely could have been improved with some better planning, like how I’ve started planning my next project with Trello. Trello would have allowed me to also not forget about making tumblr posts. As soon as I finish a task I tick it and move it and then I write about which I think I definitely needed as I found myself creating something and then immediately thinking about something new and jumping into making that. I think that my project came out well, of course I would have loved to have voice acting but even without voice acting I think my game has expressed the emotion I wanted it to and it allowed me to learn how to manage my time better.


Comments